When we bought our pop up camper (who we have named “Shirley Jean”), we really wanted one that was ready to roll (pun!). While we don’t mind a project generally speaking, we don’t have the ability to pop it up in our yard or driveway for long stretches to work on it (#HOARules). Plus, we were ready to travel and use it!
Of course, used pop up campers are not going to be perfect, especially in the price range we were comfortable in. So when we got Shirley Jean home, we realized one of the first things that needed to be fixed were the curtains.
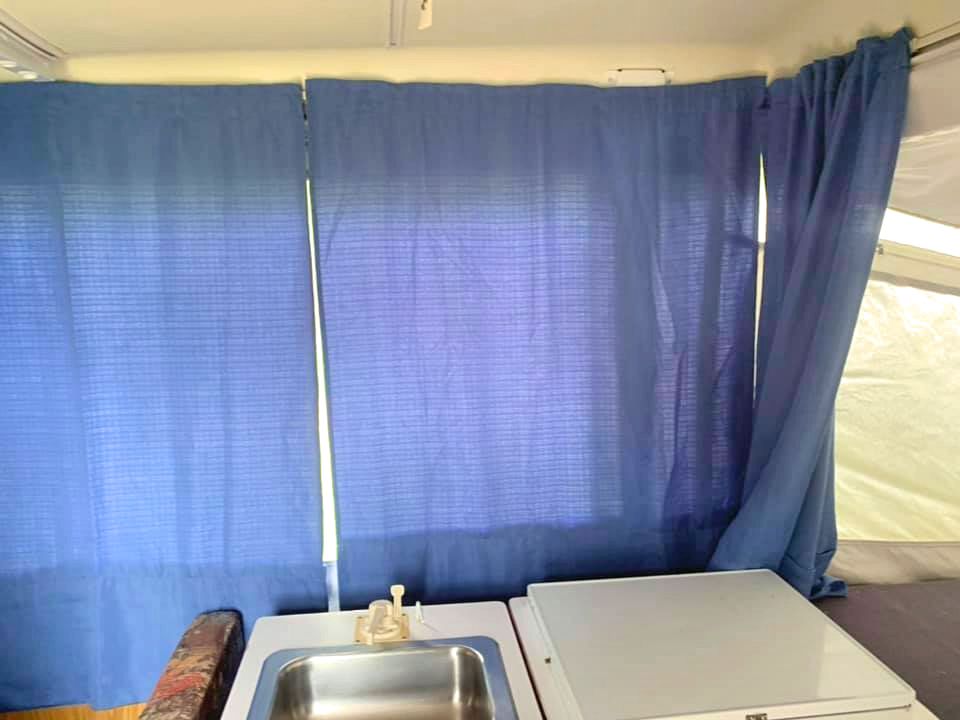
Although they didn’t look bad at first glance (this is the listing photo) it became about function.
Our camper had only two previous owners, and the family we bought it from only owned it for a few months and never took it camping. But somewhere along the line, the updates and maintenance work on the camper had become creative yet ineffective and definitely not enduring.
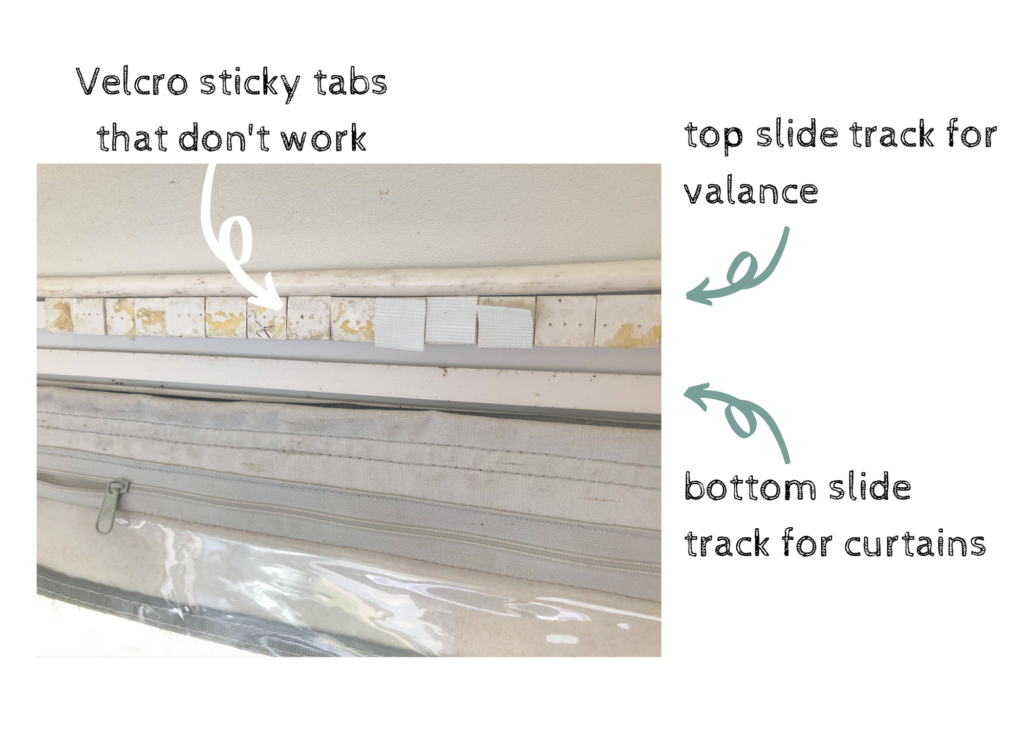
For example, to hang the curtains, they used Velcro sticker strips that promptly melted with any heat, humidity or sunlight. This meant that the curtains were falling down all the time.
If you’ve never been in a camper before, the curtains attach on slides and tracks. There is a top slide for a valance. This hides a lot of the cords and electrical. (We have not added a valance to Shirley Jean yet.) The bottom slide is for the curtains themselves.
Figuring out how to attach the curtains to the slides was the trickiest part of this entire renovation.
We knew what they had done -sticker/adhesive tabs – did NOT work. Yet without the original option, we weren’t sure what was the camper was designed to do.
Internet research wasn’t all that helpful, either. There are a few snaps and ideas for slide track curtains in pop up campers out there. (See this and this for two very helpful posts that informed our decisions a lot.)
But we have a 1996 Coleman pop up. So our slides were a little different. And, again, we really wanted something that would last and survive heat, humidity, and two young boys.
After a lot of research, procrastination, measuring, ordering, returning and reordering, this post details what we did. And this method has been GREAT! Our curtains are now durable, they stay in place, and they slide so easy!
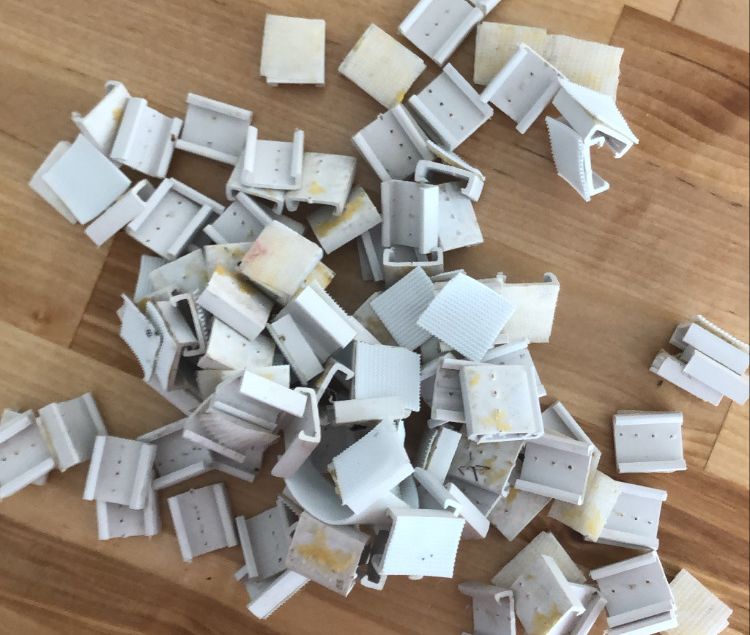
The old Velcro tabs out of the camper!
Note: There are some affiliate links below. This means that when you click, at no cost to you, The Family Trip receives a small benefit to support our website. You can read our disclaimer here.
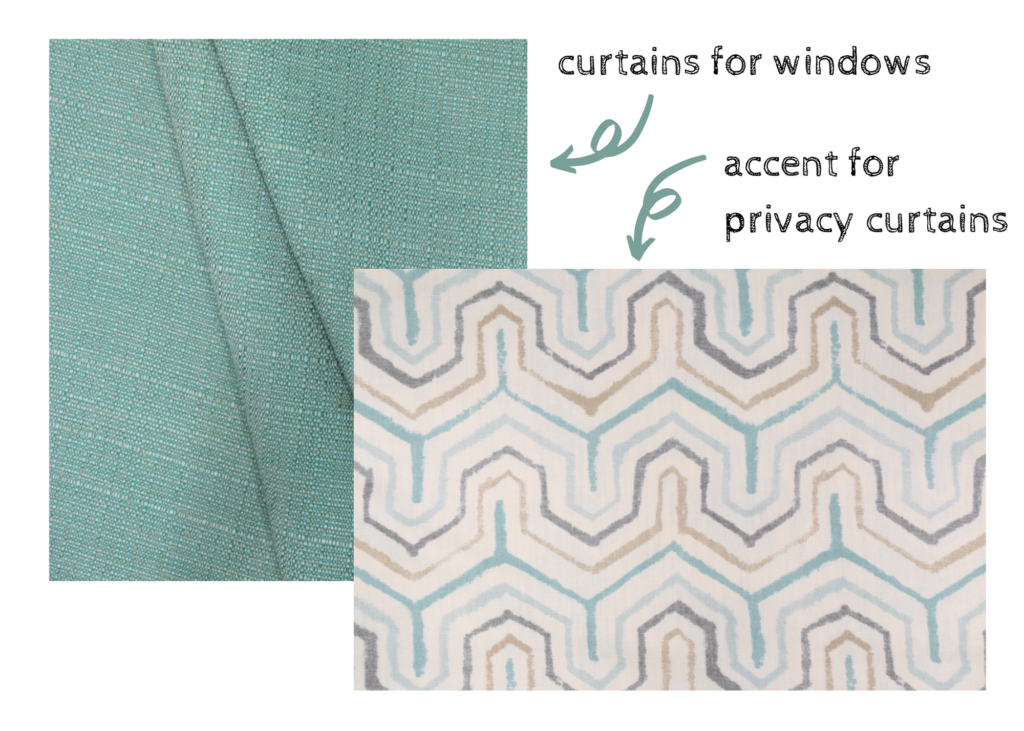
For fabric, I waited for a really great Joann Fabrics sale. I decided on a Richloom cotton drapery fabric in Athens mineral for the privacy curtains, available today at Decorative Fabrics Direct. This was there I felt like I could really have some fun – but I also wanted to balance between the age and style of the camper with an updated flair. And, of course, all in a print I felt would age well and reflect our personalities. It was a big choice! But one I am happy with.
And for the windows I chose a linen texture, plain colored fabric that was indoor/outdoor prepared, durable, washable, fade resistant, that I also liked. The one I got is a Solar Outdoor Linen in Texture Teal, still available today at Joann.
When it comes to purchasing an amount of fabric, it really depends on the size of your bolt and whether or not you have a pattern/former curtains to work with.
I did a LOT of math (and by that I mean impressively scribbling numbers then using a calculator). I took down the old curtains and measured those to see what sizes they used – although I did decide to go longer on some panels than others, with mixed results (more on that later).
I didn’t buy enough fabric the first time and had to go back to get more. My best recommendation is to lay everything out – or at least draw a diagram – to determine what you are going to need. Then ask for help at the cutting desk. Our clerks at Joann here are so friendly and just love crafting, so if you are nice to them and wait patiently in their long line, they will usually help.
Full List of Supplies to Make Pop Up Camper Curtains:
Sewing machine Iron & ironing board Scissors Tape measure Pins Sew in tape Fabric for interior privacy curtains Fabric for curtains for windows Thread A zipper foot
Instructions to Make Pop Up Camper Curtains:
MEASURE and determine how many panels you want and need, as well as their lengths. Then CUT.
I decided on:
for the privacy bed curtains 4 panels at 39 ” x 51 ” each FINISHED length
for the back wall (the longest, over the sink) I wanted 3 at 41 ” x 51 ” FINISHED length
for the front two windows by the door, I wanted 1 at 28 ” x 51 “, 2 at 32 ” x 51 ” FINISHED length
WHEN CUTTING: cut an extra 1 inch on the top and bottom, and at least an extra 1/2 ” on the sides to allow for a seam allowance.
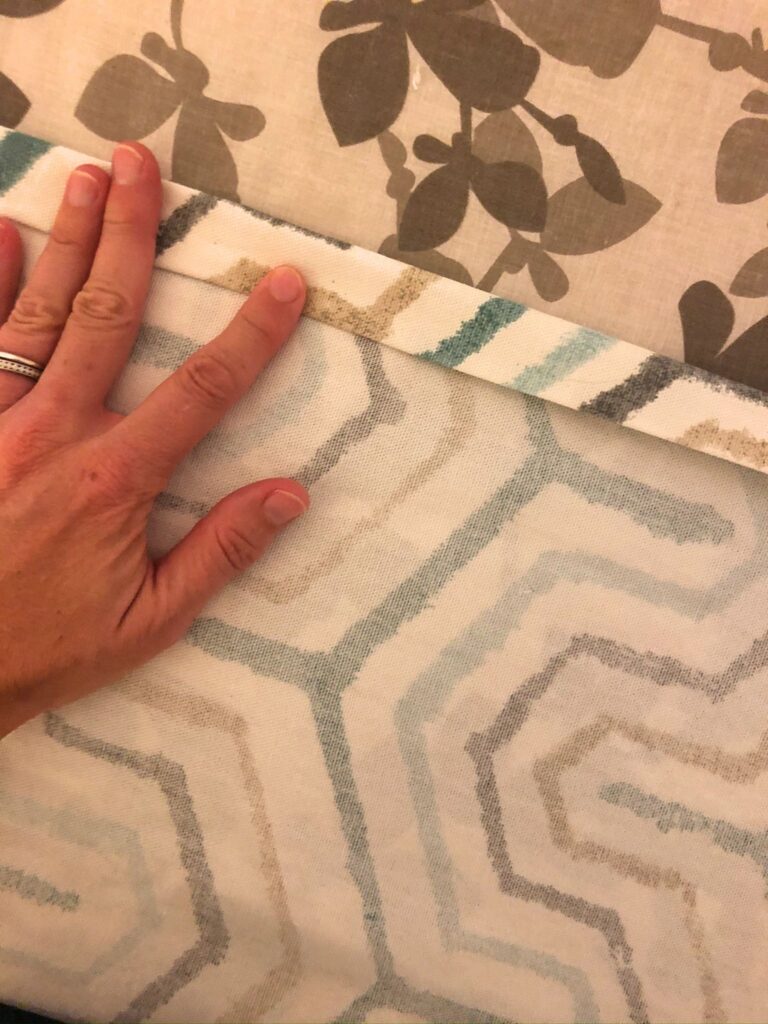
SEW THE SIDES of the panel. To give these a polished edge and to prevent fraying, I double-folded (fold once, then fold again), then ironed, then sewed. I used about a 3/8″ seam allowance.
SEW THE BOTTOMof the panel. I did the same technique, but I did a larger seam allowance at around 1″ and did a zigzag stitch on my machine – just for fun.
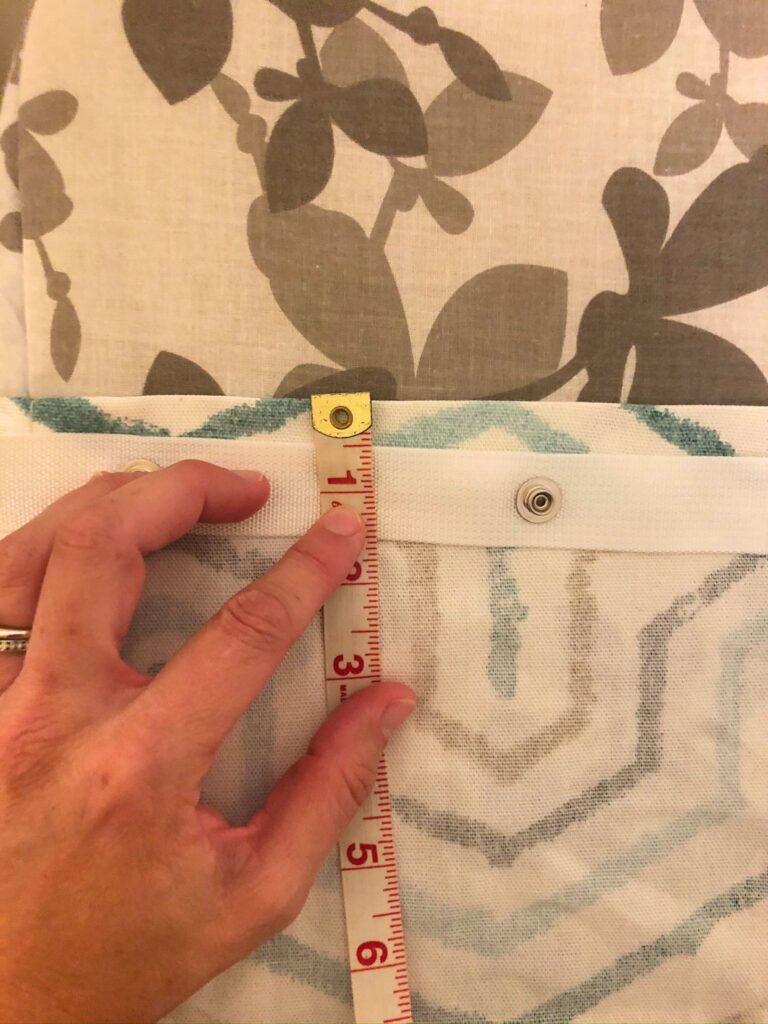
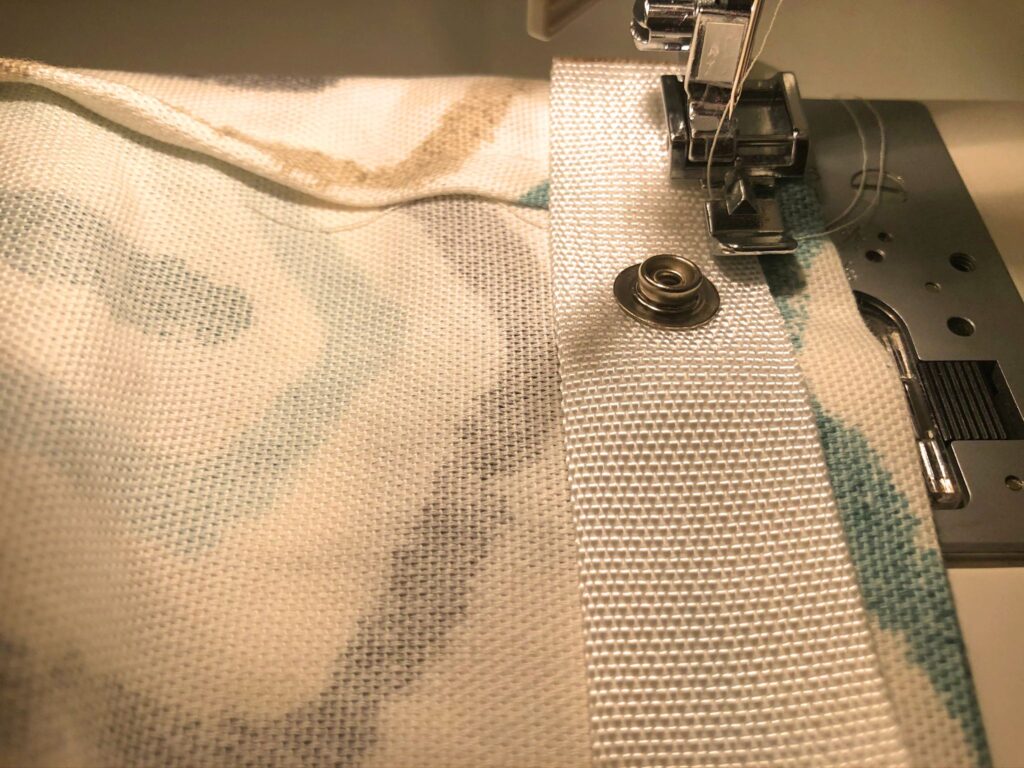
SEW THE SEW-IN SNAP TAPE TO THE TOP OF THE PANEL. Here I only folded once, but made it a full inch, then ironed. I pinned the sew-in tape across the top.
Note: place your snaps where you want them and trim your tape accordingly. For example, I knew it was important to have snaps fairly close to the ends of the curtains to hold them well. So start on one side and run the tape across, making sure your first snap is where you want it in relation to the end of the curtain.
Also, it is possible to use two pieces of tape if you don’t have enough to be continuous across the top. Just overlap the tape between the snaps and sew them on. This can save waste!
To sew the tape, use your zipper foot. Otherwise, your presser foot will certainly catch on the snaps.
REPEAT FOR ALL PANELS.
SNAP THE SNAPS INTO THE SLIDES. PUT THE SLIDES ON YOUR TRACK.
That’s it! The sewing part doesn’t take much time at all. It’s the measuring and the planning that, for this project, is the most time consuming.
Note that in some places on the outside curtains’ track, you will need to go around electrical wires and “straddle” areas and that’s totally okay. Know that this is how these are designed and they will still be durable.
Things to Watch Out for When You Make Your Pop Up Camper Curtains:
1- I bought a linen-based fabric because it is an indoor/outdoor fabric (and while we are not blackout curtain folks, you can certainly line your curtains if you want more light and temperature control). While the fabric isn’t 100% linen, it still wrinkles too easily for my liking. So I might opt with something like a duck cloth if it’s available – something indoor/outdoor but cotton based – when/if I do this again.
2- While these are “snaps,” they are very high-grade, tight snaps. Do not anticipate that these are going to just snap on and off with a short pop. We had to put some serious pressure on the slides to get the snaps in the holes. Good news though is that they stay!
3- And, my final word of caution, I made our curtains TOO long. While I wanted to go longer than the originals, I went so long that they kind of get in the way of the counters, bed rails, etc. So really think through your length.
We love taking Shirley Jean on trips. She’s shielded us from rain and thunderstorms, cold windy nights and mornings, as well as hot and humid Tennessee days. She is the right price for us and also allows us to still feel like we are connected to nature and actually camping.
But while we don’t want a “hotel room on wheels,'” any way that we can increase our comfort just a little more, save our camping neighbors from seeing us in our undies, and increase Shirley Jean’s (let’s be honest) resale value is totally worth it.
Once we made the decision on how we were going to attach these new curtains to our camper, this was a really easy project – and with a huge reward! The new curtains are so functional and fresh! They are definitely more “our style.”
We’ll work to get better what-it-looks-like-now pop up camper photos on here. We also have some other tips on functional upgrades we’ve made that we’d be happy to share (let me know if you are interested).
10 thoughts on “How to Replace Pop Up Camper Curtains”
Hi i am in Tennessee and i am slowly fixing up our pop up and i was using your sewing idea and was wondering if our pups are the same so i can use the measurements u have. Mine is a 2000 Coleman Sedona. Thank you for your wonderful posts and ideas.
Thanks for asking! I actually sent an email in the hopes it would be easiest. But our Coleman is a 96 model, and I think specs are available online if that is helpful?
Hi, First I’d like to thank you for all the helpful information on making curtains for pop up camper. I recently bought a Coleman/Columbia one in good condition and previous owner said it was in the 70’s but the registration has “90” on it. It came with deep reddish/pink curtains which I want to replace and being new to campers I’m not sure about attaching them. I really like the idea of the snaps. My question is, will I be able to slide the curtains open and close by using the snaps?? I also would like to add valances. I checked so many sites on materials but found the prices to be way too expensive to make. My calculation for yardage was 18 yds!. That’s doing both side windows and both bunk areas. Any suggestions?
Hi Judy! Thanks for the questions. So the snaps connecting to the slides and the slides themselves – both are camper products that are linked in the post. While the snaps themselves are on the curtains and then snap into the slides (potentially allowing them to be changed out some day or easily taken down for cleaning – although we found the snaps super tight!), the slides move on the rails incredibly easily. So yes, we are still able to move the curtains open and closed.
We opted not to do the valance simply because 1) price, as you mention and 2) while they give the camper a more finished look and may hide some wires/tubes/etc they weren’t necessary for performance for our pop up. A lot of the valance calculation would depend on how tufted and ruffled you want them to be. If you want them to bunch and gather, you need more material than if you just went with a straight valance, no gathering.
Here is a Pop Up Princess post to consider: https://www.thepopupprincess.com/pop-up-camper-remodel/curtains/pop-up-camper-curtains-part-2/ But I will say that her curtain rings are very hard to install (hence why I opted for the snap tape: WAY easier) and we also do NOT like putting Velcro or anything adhesive to our camper. We have spent a lot of time trying to remove junk and dirt from the previous owners’ obsessive use of things like that on the camper and they leave long-lasting damage.
If you do buy fabric for the valances, be sure to price shop (some fabrics are going to be cheaper) and wait for a good sale!!
I enjoyed your post on replacing curtains in your pop-up and believe the method you chose will work well for our recently purchased 1995 Viking pop-up.
Unfortunately, the Viking does not have rails or tracks installed for curtains. Do you know the rail or track compatible with the JR products you chose?
Thank you.
Hi Shay- Interesting! I tried to find some pictures online to see how they are attached to your camper, then, but couldn’t find any? How does Viking attached the curtains to the walls? The snap tape fits with many different slides, but picking the snap tape is easy once you find the slide you need. JR Products automatically links the matching slide tape on Amazon, for example. But picking the slide depends on your width of your rail. I *believe*, if memory serves, we were at 3/4in. But I wonder if the Internet or a user manual for your particular Viking would be clearer on this? I also did have to return one pack of curtain carriers because they were not the right fit. I wish it were more of a perfect science! But there are so many models and information for these 20+ year old campers seem hard to find.
First of all, thank you so much for the great ideas. My question is, how likely is it that I can take these down to wash them every 6 months to year? Can the slides be removed while still snapped on to the curtains themselves? I know you mentioned the snaps are on there really good. Thanks so much.
Great question! For us, the slides are very easy to take off the tracks just given the way our pop up is set up, but I wouldn’t put the slide brackets through the washing machine or dryer. The snaps do make it possible to remove the curtains entirely from the slides brackets, which would make washing very easy and safe. But, again, it takes some prying to remove the snaps from the slide brackets. But taking the slides off the tracks, then removing the slide brackets from the snap tape is the best for washing (and there may be a cheat for removing the snaps from the slide brackets that I don’t know of). Given all the possible curtain attachment methods, this actually seems to lend itself the easiest to washing.
Does that help?! Feel free to post with any follow ups! I’ll do my best to answer and help out!
This is wonderful information you’ve shared. Our pups are the same year model and very similar. I’m loving the idea of the snap curtains, but I can’t quite picture the snaps on the slides. Is there a pic or further information you have to share about the snaps on the slides? Thank you so much! Happy Camping!
I don’t! I am sorry! Those curtain carriers pop onto the rails that go around our pop up, then the tape I sewed onto the fabric that has the snaps on it snaps into the carriers. Although, I found it was easier to snap the snaps from the tape into the curtain carriers first, then attach the carrier to the pop up rail inside. Those snaps on the tapes are TIGHT. Does that help at all?
Our website uses cookies to provide you the best experience. However, by continuing to use our website, you agree to our use of cookies. For more information, read our Cookie Policy.

")

")
")

Hi i am in Tennessee and i am slowly fixing up our pop up and i was using your sewing idea and was wondering if our pups are the same so i can use the measurements u have. Mine is a 2000 Coleman Sedona. Thank you for your wonderful posts and ideas.
Thanks for asking! I actually sent an email in the hopes it would be easiest. But our Coleman is a 96 model, and I think specs are available online if that is helpful?
Hi, First I’d like to thank you for all the helpful information on making curtains for pop up camper. I recently bought a Coleman/Columbia one in good condition and previous owner said it was in the 70’s but the registration has “90” on it. It came with deep reddish/pink curtains which I want to replace and being new to campers I’m not sure about attaching them. I really like the idea of the snaps. My question is, will I be able to slide the curtains open and close by using the snaps?? I also would like to add valances. I checked so many sites on materials but found the prices to be way too expensive to make. My calculation for yardage was 18 yds!. That’s doing both side windows and both bunk areas. Any suggestions?
Hi Judy! Thanks for the questions. So the snaps connecting to the slides and the slides themselves – both are camper products that are linked in the post. While the snaps themselves are on the curtains and then snap into the slides (potentially allowing them to be changed out some day or easily taken down for cleaning – although we found the snaps super tight!), the slides move on the rails incredibly easily. So yes, we are still able to move the curtains open and closed.
We opted not to do the valance simply because 1) price, as you mention and 2) while they give the camper a more finished look and may hide some wires/tubes/etc they weren’t necessary for performance for our pop up. A lot of the valance calculation would depend on how tufted and ruffled you want them to be. If you want them to bunch and gather, you need more material than if you just went with a straight valance, no gathering.
Here is a Pop Up Princess post to consider: https://www.thepopupprincess.com/pop-up-camper-remodel/curtains/pop-up-camper-curtains-part-2/ But I will say that her curtain rings are very hard to install (hence why I opted for the snap tape: WAY easier) and we also do NOT like putting Velcro or anything adhesive to our camper. We have spent a lot of time trying to remove junk and dirt from the previous owners’ obsessive use of things like that on the camper and they leave long-lasting damage.
If you do buy fabric for the valances, be sure to price shop (some fabrics are going to be cheaper) and wait for a good sale!!
Let me know if you have any other questions!
I enjoyed your post on replacing curtains in your pop-up and believe the method you chose will work well for our recently purchased 1995 Viking pop-up.
Unfortunately, the Viking does not have rails or tracks installed for curtains. Do you know the rail or track compatible with the JR products you chose?
Thank you.
Hi Shay- Interesting! I tried to find some pictures online to see how they are attached to your camper, then, but couldn’t find any? How does Viking attached the curtains to the walls? The snap tape fits with many different slides, but picking the snap tape is easy once you find the slide you need. JR Products automatically links the matching slide tape on Amazon, for example. But picking the slide depends on your width of your rail. I *believe*, if memory serves, we were at 3/4in. But I wonder if the Internet or a user manual for your particular Viking would be clearer on this? I also did have to return one pack of curtain carriers because they were not the right fit. I wish it were more of a perfect science! But there are so many models and information for these 20+ year old campers seem hard to find.
Have you seen this post about how you can reuse carriers that are in fine condition? https://www.thepopupprincess.com/pop-up-camper-remodel/pop-up-camper-makeover-the-curtains/ It’s not the same method we used, but it may be a legitimate option?
First of all, thank you so much for the great ideas. My question is, how likely is it that I can take these down to wash them every 6 months to year? Can the slides be removed while still snapped on to the curtains themselves? I know you mentioned the snaps are on there really good. Thanks so much.
Great question! For us, the slides are very easy to take off the tracks just given the way our pop up is set up, but I wouldn’t put the slide brackets through the washing machine or dryer. The snaps do make it possible to remove the curtains entirely from the slides brackets, which would make washing very easy and safe. But, again, it takes some prying to remove the snaps from the slide brackets. But taking the slides off the tracks, then removing the slide brackets from the snap tape is the best for washing (and there may be a cheat for removing the snaps from the slide brackets that I don’t know of). Given all the possible curtain attachment methods, this actually seems to lend itself the easiest to washing.
Does that help?! Feel free to post with any follow ups! I’ll do my best to answer and help out!
This is wonderful information you’ve shared. Our pups are the same year model and very similar. I’m loving the idea of the snap curtains, but I can’t quite picture the snaps on the slides. Is there a pic or further information you have to share about the snaps on the slides? Thank you so much! Happy Camping!
I don’t! I am sorry! Those curtain carriers pop onto the rails that go around our pop up, then the tape I sewed onto the fabric that has the snaps on it snaps into the carriers. Although, I found it was easier to snap the snaps from the tape into the curtain carriers first, then attach the carrier to the pop up rail inside. Those snaps on the tapes are TIGHT. Does that help at all?